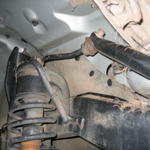
The front swaybar links attach to a bracket on your front axle on the bottom side, and to a sway bar on the top side. The sway bar goes from one side of the axle, up and on top of the frame where it is attached, and back down to the other side. This system only allows a certain amount of flex from your front axle, allowing for better manners than a fully disconnected system. When you drive your jeep offroad, having your front swaybar disconnected will allow you to gain the maximum flex out of the front axle. This means keeping your tires on the ground longer, which we all know is a good thing. The trouble is most companies charge $100-$200 for a set of quick swaybar disconnects. If you’re in a position like me and plan on buying a lift eventually, it may not be worth spending that money, only having to spend it all over again when you get a lift on longer disconnects. In comes this very easy mod. With about $5 in parts you can make your own swaybar disconnects to easily disconnect on the trail without having to use tools.
Tools:
- T55 Torx bit
- Ratchet
- 18MM wrench
- Floor jack (possibly)
Parts:
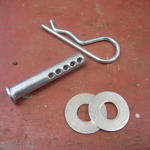
- 2x 7/16″ x 2-1/2″ Clevis pins
- 2x Cotter pins
- 4x 7/16″ Grade 8 washers
Time:
- 20 minutes
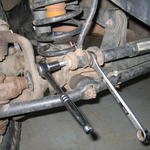
1: Remove the bolts holding your sway bar links in place. If you have troubles getting the bolts out once the nut is off, using a floor jack to slightly lift up on the frame will help.

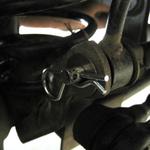
2: Insert your pin with a washer on each side into the hole where the bolt was. Make sure you leave the large washer that was already on the stock bolt in place. It may depend a little on how worn your links are, but I am currently using the 2nd hole towards the end of the pin. As with the 1st step you may need to use a floor jack just a bit to get them in.
Once you’ve got everything done you’re ready to hit the trails! When you’re ready to disconnect you simply pull the cotter pin out, pull the clevis pin out, and swing the rod up onto your spring perch. This is done by grabbing a hold of the sway bar (the bar that goes from the link on one side, up towards your bumper, under the plastic part that says “JEEP”, and over to the other sway link) and swinging it inwards and upwards as far as it will go. Once in this position you should be able to rest the sway links up on top of your spring perches. It may take some effort to do this. My driver’s side was tough, but I was able to do it by hand. Once up there they should stay put, but it’s always a good idea to tie them up with a bungee cord or zip tie.
Having issues getting your clevis pins in and out? This is usually caused by a winch and or bumper on the front of your jeep. A quick lift on the bumper by a friend should do the trick, since you probably don’t want to get out a jack on the trail every time you want to disconnect/reconnect.
Note: This modification was done on my 2003 TJ. All model years older than 2003 may not use metric fasteners so your tools and bolts may vary slightly. Please do not follow my instructions blindly without checking stuff like bolt sizes out first.
I’d like to give a shout out to 4x4xplor.com here. I first saw this idea on his site, and since I did the mod myself I wanted to add it to the articles listed here. All the writing and photos in this article are my own, I have only done a write-up on the same mod.