For those of you that are into wheeling (and I expect that you are if you’re at this site reading about Jeeps), you probably already know the importance a locker can play in your off-road adventures. I wasn’t planning on locking my dana 35 rear axle, but a deal came a long I couldn’t pass up. A local jeeper was selling a Detroit EZ-Locker for a d35 for $200 CDN cash. I quickly snapped up the deal, and went home to see how I made out. I went to the detroit website to get a parts listing of the unit. If I was as smart as I like to think I am I would have done this before giving the guy my money. Turns out the locker was missing the small springs and caps, and I could not install it. After several attempts at getting in touch with him (he was clearly screening my calls and avoiding me), I gave up and looked at other options. I talked to my buddy Moe from the jeep club who works at Alberta Driveline. He was able to order a service kit for the locker for $10! SCORE! It took a couple weeks to come in, and I got it installed yesterday.
Tools:
- Ratchet
- 13mm socket
- Gasket scraper
- 1/4″ 12 point wrench
- Pliers or Needle nose pliers
- BFH (big f’in hammer)
- Steel Chisel
- Pick tool (small long flathead screwdriver works)
- Catch pan
- Funnel
- Fluid pump (for refilling your diff)
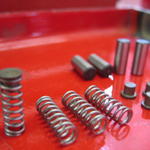
Locker Parts:
- 2x Side gears
- 2x Clutch gears
- 2x Spacers
- 4x Pins
- 4x Springs
- 4x Spring Caps
Parts:
- Assembly or automotive grease
- Gear oil (2L)
- RTV gasket maker
Time:
- 2-3 hours

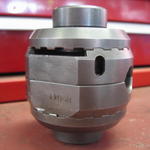
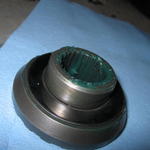
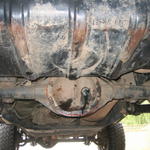
1: Start off by checking your locker for all its parts, and ensure you have the consumables (gear oil, rtv, grease) and tools you will need. Park your jeep on level ground, chock your front tires and crack the rear lugnuts. Jack up the rear end of the jeep and place jack stands under the frame just high enough to get the back tires off the ground. I say under the frame because it will allow your axle to droop so your pumpkin isn’t hiding behind the gas tank. Remove the rear tires.

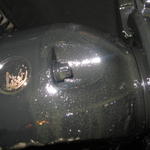
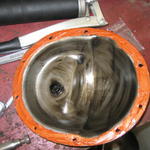
2: Place a catch pan under your rear differential, loosen the top bolt, and remove all the other bolts holding your diff cover on. Use your BFH (big f’in hammer) and a chisel to tap around the edges of the cover until it breaks free of the gasket. This will spill fluid (into your catch pan I hope). You can then remove the last bolt and pull the cover off by hand to let the fluid completely drain.
3: If you can see the 1/4″ bolt that holds the carrier shaft in place go ahead and remove it. If you cannot see it, you will need to turn the carrier so you can get access to it. This can be done two ways. The easy way is by simply turning your jeep on and letting the rear axle turn half a turn (or as much as you need) by “driving” it while it’s on the jack stands. PLEASE NOTE: This is not a very safe thing to do, so make sure you are safe in doing it. Make sure no one is in front or under the vehicle. Make sure you do not let it run more than a rotation or as much as needed (remember there’s no oil in there). I do not take responsibility for any damage you case by doing it this way. The hard way is by rotating the carrier by hand. You will need to use a pry bar or something similar to move it. You could also turn the driveshaft by hand with a clamp on the u-joint yoke or possibly a good filter wrench around the shaft. Once the 1/4″ bolt is removed the carrier shaft will slide out.

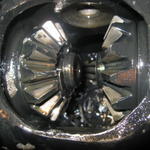
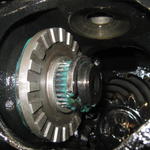
4: With your carrier shaft out you can then turn your wheels by hand and the spider gears will fall out. Make sure you get the washer for each spider gear out of there too. Your spider gears are the top and bottom gears in that group of four gears.
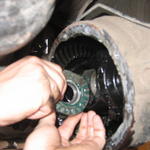
5: Go to one of your drums and push inward on the wheel mounting surface. This should push your axle shaft inwards allowing the c-clip that holds in the axle shafts to drop into the differential. If it doesn’t drop in you can push in and turn it at the same time. Repeat for the other side. Now that the c-clips are out, you can push outward on the axle shaft from inside your differential and the side gears should come out. On the outside of the side gears there are two washers. They are called thrust washers. Make sure you don’t lose these, as you *will need* to use them in the locker install.
6: Now that we’ve got your D35 all torn apart, you’re ready to install the locker! Leave your axle shafts hanging out a bit so they are not protruding into the carrier. Apply a liberal amount of grease to one of the side gears on the locker. Place a thrust washer on it, and put some more grease on top of the washer. Grease the splines of the side gear as well.
7: Insert the side gear into the ring side (driver’s side) of the carrier. It will sit in place on it’s own. Now you can push the axle shaft back in slowly and turn the side gear by hand to intersect the splines. A friend helps for this. Once the side gear is on the axle shaft, and it is pushed all the way in, you can install the c-clip back on the shaft. Sharply pull out on the axle shaft and it will seat the c-clip in it’s place. Grease up your other side gear and thrust washer and insert it the same way. Do not push the 2nd axle shaft in or install the c-clip yet.
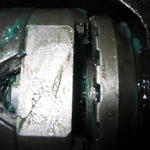
8: We’re moving along now, but it gets a little trickier from here on. Grease up a clutch gear and place a spacer inside it. The clutch gears are the other (inner) large gears, and the spacers are the round parts that fit inside it. Place two pins in the two deeper slots that will hold the springs. If you’ve done this correctly the pins will sink right into the clutch gear so nothing is protruding the inner edge. This is important because there is not enough room inside the carrier to insert the last clutch gear if the pins are protruding. Do the same with the other side. If all is going well your locker should be “fully” in the carrier with an axle shaft and c-clip installed on the *ring side only*. Like so: Thrust washer -> Side gear -> Clutch w/ spacer and pins -> 2nd Clutch w/ spacer and pins -> 2nd Side gear -> Thrust washer. Everything should already be greased of course.
9: Do a quick check of your remaining parts.. you should only have a c-clip, and springs/caps left to install. This next part is kind of a pain in the ass, but you can manage. You will need to adjust both spacers so they are towards the ring side as much as possible. It will take some wedging of your fingers and a small screwdriver will help. Once you have both spacers towards the ring side as much as they will go, you can go ahead and get the axle shaft into the splines on the remaining side gear. Once again a friend helps here, but make sure he doesn’t pinch your fingers as you line up the side gear. Trust me.. it doesn’t feel good. 🙂
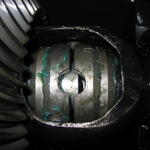
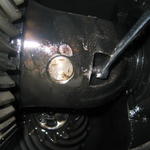
10: Now it’s time to install that last c-clip. Rotate the left axle shaft until you can see the “c-clip install slot”. This can easily be done by hand by just rotating the left side of the locker. You can open up that slot a little extra by pushing the clutch gear away from the side gear. Then you will need to line up the axle shaft so you can see the slot that holds the c-clip through that slot. A picture is worth a thousand words I guess, have a look at the photo here to see. Install the c-clip then pull outward sharply on the shaft from the wheel mounting surface to seat it.
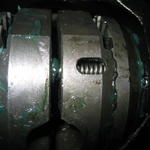
11: Seat the clutch gear back on the side gear so your gap is in the middle of the clutch gears. Insert the caps into the springs. Make sure your clutch gears have their “c-clip install slot” on the same side, then choose one of the four pins and use a pick tool or another pointy object (I used a small flat head screwdriver and it worked well) to move it from the “spring side” to it’s home in the other side of the opposite clutch gear. Insert one of the springs with the cap towards the inside in the slot that the pin you just moved was. Use your pointy tool to push in and fully insert the spring into it’s home. Rotate the locker by hand and repeat this step for all four pins.
12: Almost done! With all four pins/springs installed you just need to get your carrier shaft back in. To do this you need to move the spacers apart again so one is on each side, leaving a gap in the middle. This is a little tricky. Like street tires in the mud, they will be all greased up and slippery, and there’s not much room to get your fingers in there. With the spacers in their permanent home, you can go ahead and insert the carrier shaft and re-install the 1/4″ 12 point bolt that holds it in place. Now is a good time to make sure everything is installed correctly. You should be able to turn an axle by hand backwards from the drum and the other side should turn as well. If you go forwards however the locker should disengage and click forwards on it’s own. If it does not disengage don’t worry too much about it. There is currently no resistance on the other wheel so it might not disengage. A good test for this would be to install a tire on one side, get it of the jack stand so the tire sits on the ground, then turn the drum on the other side forward. With the other tire on the ground you should be able to disengage the locker by hand and hear it click forwards.
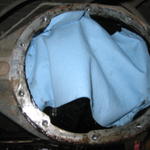
13: Place a rag inside and around your gears to keep the gunk and debris from getting in there. Grab your gasket scraper and clean up the mounting surface on the diff, and the cover itself.
14: Grab your RTV Gasket maker and apply a liberal bead to the mounting surface of your diff cover. Spread it around with your finger and make sure you have RTV on both sides of each bolt hole. The packaging for my RTV says to use a 1/16″ to 1/4″ thick bead. Put the diff cover in it’s place and finger tighten each bolt until you can see the RTV start to squeeze out a bit. You will need to let it sit like this for one hour to “set”.
15: Get a beer and BBQ yourself a steak for a job well done. Mine was friggin’ delicious! Nurse your skinned knuckles and pinched fingers while you wait for the RTV to set… Once the hour is up tighten the bolts on your diff cover to 55 ft lbs, and fill it with gear oil. Reinstall your fill plug, tires, and get that jeep off it’s jack stands!
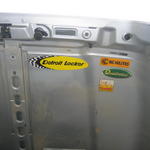
16: Check to make sure you’re not running over anything (like the catch pan), then take it for a test drive. The differential will be solidly locked when moving straight forward, and you will likely notice immediately that it feels very different. Take a sharp corner at a low speed with a tiny bit of throttle, and you will feel the locker disengage. You will be able to hear the locker ratchet forward as the outer tire free-wheels faster. You are now locked and ready to rock! I bought the locker without packaging so I didn’t get a sticker… but I did grab a detroit locker sticker from a jeep show a couple years back so that had to get installed under the hood with the rest. I know it’s not a “EZ Locker” sticker, but it will do!
Keep in mind that the detroit is known for it’s not-great manners on the road and it will want to sometimes jerk a little bit while it disengages at the start of a corner. When it does this it’s natural to want to jam in the clutch and slow down or stop to prevent damage. I have learned however that if you “stick with it” and keep driving normally around the corner it will only jerk once then immediately disengage as it should. You also need to make sure you do not give the jeep a bunch of throttle while cornering. Your front tires will be steering your jeep, while the back tires will lock up and want to go the direction they are currently facing instead of around the corner. This effect can be felt in a small dose on purpose, but I can assure you it would not be good for the jeep or differential to really give’er. I’m sure that each install will act a little different, and it will definitely take some getting used to on the road, but despite my rantings, it is quite live-able. Really though, if you’re not willing to put up with a little bit of noise and your jeep acting different on the street this locker is not for you. I have yet to use it off-road, (only had it for one day as of this writing), but I am sure I will be very pleased with it’s performance. I did test out the “donut-making” abilities of it in a gravel parking lot, and it brought a wicked smile to my face. I can’t wait to get it out on the trails, and I will be reporting back here when I do, so keep an eye out for that.
UPDATE! I had a chance to go out wheeling this weekend in some great test-worthy terrain. We found *lots* of mud, some really great wash-out/technical stuff and a little tricky hill climb. The locker was almost completely invisible on the trail as far as noise, and handling of the jeep is concerned. I did notice my turning radius on slick terrain to be slightly-but-notably wider. It *did* however perform way beyond my expectations. I purposefully chose a couple optional loops that I knew would get me into trouble, and to my surprise I got through all but one with my near-to-stock jeep. I had a rear tire in the air at least a couple times, and it was a new experience being able to move out under my own power in a situation like that. In mud it’s just… awesome. You can pull through mud holes with less effort and speed than normal, and it gives you confidence to get into worse trouble if you are like me. 🙂
For a first impression overall.. I say it’s the best $200 modification I have done to date hands down. I still don’t like it on the street much.. but I am getting better and better at driving with it, and I can definitely put up with some noises for the traction gained off-road. I hope that helps!