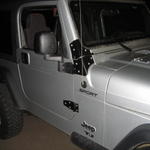
This is how I decided to powder coat my hinges. On my 2003 TJ the paint around the hinges for my windshield and doors were chipped and rusting. It was particularly bad on the driver’s side door because that’s what gets used the most. You can buy a new set of stainless hinges (painted or chromed) for the doors and windshield for about $200 USD, but I just happen to have a good friend who works at a powder coating shop. He had previously tested the idea out on the small lower door hinges on his black jeep, and they turned out fantastic. They look good, and the powder coating was put on nice and thick, so they were tough too. I decided to take the dive and do all of my hinges over the last couple weeks. I didn’t do my hood hinges because they are not in need of a repair.. they seem to be holding the factory paint really well. I might do them later cause I think black hinges look pretty cool on my silver jeep, but it seems like a lot of work for just a cosmetic change.
Tools:
- Ratchet
- T40 Torx
- T25 Torx
- Sanding tools or sand blaster
Time:
- 30 minutes (removing hinges)
- 4-5 hours (sanding)
- 30 minutes (reassembly)
- 1 hour (painting)
1: Open your doors, lift the limiting straps off their posts on the tub, and take your doors off. If you are having troubles doing this, consult the TJ forum sticky posts at
jeepforum.com for a few tricks.
2: Remove the mirrors from your doors. This is done my removing the three T25 Torx bolts holding them onto the hinge.
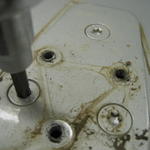
3: Remove your hinges. They are held on by three T40 Torx bolts each, and are secured in with loctite. They are very tough to break free.. you will want to make sure you have a really good quality torx bit, and a good solid place to set your doors to remove them. Place lots of downward pressure on the ratchet while you do it, and keep a close eye on the bolt to make sure you are not stripping it. I was sure there was a plate inside the door that the bolts attached to, so at first I had the doors upside down so I could remove the bolts, and allow the plate to stay in place. This would save me having to take the doors apart to line up the plate and get it all back together. Once I had the hinges off I was able to see that the plates are held in loosely by some sort of bracket, so you will likely not have to worry about it. I cannot speak for older models of TJs however, so keep an eye on that while you take them off.
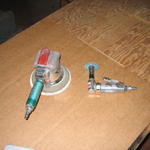
4: Time to sand! Proper painting preparation is the most important part of the operation. If you have any way of getting them sand blasted I would definitely recommend it. Even if it costs you $50 or something, do it. I am certain that a sand blaster would be able to take the paint off, and it will save you about 4-5 hours of sanding. I didn’t have access to one so I used air tools to do the job, and it was a real pain in the ass. Trying to get in the little gaps in and around the hinges is very hard to do with air tools, and doing it by hand would take much too long. The back of the hinges have some sort of glued-on metal film, I assume to repel rust. When I did my smaller door hinges last week, I removed this stuff and sanded all the glue away afterwards. For the main door hinges I left it on, only because there was no rust there, and the glue will ruin a couple sanding discs trying to get it all off.
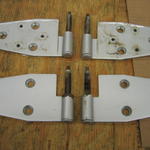
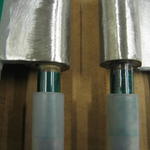
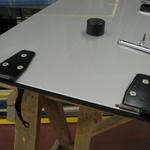
5: I’m going to continue the rest of this as if you had access to a shop as well, even though you likely won’t. If you’re going to take your hinges in to a shop to get them powder coated you can read what I did to prepare them, and possibly let the shop know what needs to be done. Once the sanding was complete I taped off the back section with a special heat tape meant for powder coating. I wanted the powder coating to reach around the edge of the hinges and onto the backside a bit, so I taped them off as such. You will have to view the full version of the image here to see exactly what I mean.
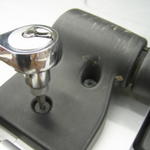
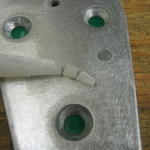
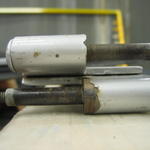
6: I then taped the bottom section of the hinge pin, and put a silicone cover used for powder coating on it. I did this in such a way that it would allow a small amount of powder to hit the pin right at the top to seal it from rusting on the hinge again. Once again you’ll have to click the full size images to see when I mean.
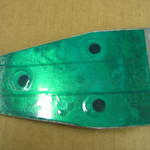
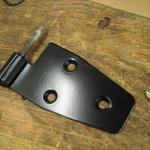
7: I then plugged the small bolt holes that the mirrors attach to. If this step is skipped the powder coating is thick enough that you probably wouldn’t be able to attach your mirrors any more. You would have to drill, re-tap and use a larger bolt. I used a tapered silicone plug and cut it to fit the hole. In the image to the left you can see there is two cuts in the plug. The middle part is what I used to plug each of the 6 holes. You can also see one of the holes plugged in the picture.
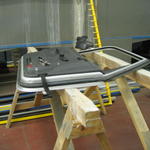
8: You’re now ready for paint. It gets sprayed with a couple different chemicals to treat the metal and degrease it. I’m not an expert on what it does really.. Then it gets washed with a pressure washer. In this particular shop the pieces are hung from a large rack that is on rollers on the roof. That way you can just hang them up, and roll them to their different stages of painting.
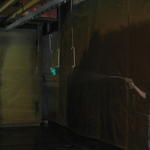
9: You then bake it for about 5-10 minutes to dry it and pre-heat it for the powder. I don’t have a good picture of the oven, but it’s just a metal room set up with a large heater blowing in. You can see the doors to it in the picture here. I’m not certain of the temperature used but I believe it’s around 200 degrees (392 F).
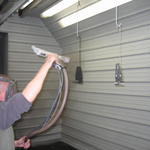
10: Paint! It’s a very fine powder blown onto the metal. The powder is shot from a gun which negatively charges it, onto the piece which is grounded. This is how it sticks.. If any mistakes are made you can simply blow off the powder with an air gun and start again.. provided the work piece has cooled a bit so the powder is not melting when it hits. It’s a very quick process and takes only a couple minutes to paint these hinges.
11: They are then put back in the oven to cure. In this particular case we wanted a nice thick finish so we baked them for 10 minutes then put on a second coat.. but this is not usually done for most applications. For the final cure they were in the oven for about 25 minutes.
12: Once they were cooled down to “slightly warm”, they are hard enough to use. I removed all the prep stuff from earlier, the plugs, tape and covers. The tape really hardens up, and it was a real task to get it off the hinge pins due to the powder coating on top of it. It was interesting though because you really get an idea of just how tough this stuff can be.. Even the large pieces of tape that were covered in powder coating all across the back were not easy to get off.
13: I then bolted them back onto my doors. I put them right back in the same position they came off of, which is easy to see because the doors are painted with them already attached. I tightened the bolts up enough to allow me to set them back into the door hinges. I didn’t tighten them all the way because some adjusting will be needed. I had to clean up the hinge pins a bit with a file. The powder coat that we let get on there because of the way I taped them was a good thing, but it was a little too thick to allow them to seat properly. Quick and easy fix.
14: Once you have the doors put back on your jeep you may have to do a little adjusting to get them sitting right again. I’m not going to tell you exactly how to do this because every one will be a little different. Kyle was doing some clean up getting ready to close the shop so I did this alone, and it was kind of a pain in the ass. I ended up using a bit of backpack-type strap rolled up and slammed in the door near the back to hold that end up while I tightened the bolts. You can then put your mirrors back on, and bask in your victory.
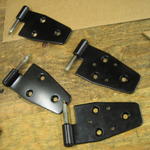
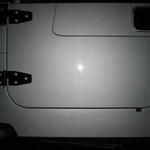
I’m very pleased with the results. My hinges are now good as new, the rust is completely taken care of, and my jeep now looks a little different.. but in a good way. You can see how bad my hinges were to the left. This install really isn’t for everyone though.. It was a convenient thing for me to do because I could do all the sanding and prep work myself. If you’re taking it into a powder coating shop, trying to describe the way to tape and plug them might be a task in itself, but who knows.. they might deal with this kind of thing all the time and it would be a breeze. Either way, if you can sand them yourself, getting your rusting hinges powder coated will likely cost a lot less than buying new ones. I got a killer deal because a good friend did it for me, but it would likely cost no more than $50-$75 to go get it done. There might be some charges on top of that for sand blasting too, but I don’t really know what that’s worth. You could also paint the bolts pretty easily, but I like the contrast of the silver bolts on the black hinge myself. I’ll post an update to this write-up sometime later, maybe 6 months down the road with an update on how they are holding up.
Those of you with a keen eye might notice that all the pictures in this article were of the door hinges only. This is because we did the windshield and lower small door hinges last week sometime, and I didn’t have a camera then. The sanding of the big windshield hinges took about 3-4 hours, and the rest only about an hour total.