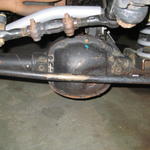
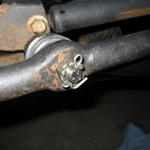
Here’s a simple upgrade that you will love. Most of us that wheel our TJs have personally experienced or at least seen a bent tie rod on the trail. It’s a very common occurrence, because the stock tie rods are not that strong. They stick out in front of your differential, ready to be smacked on that rock, ledge or tree stump. When your tie rod gets bent, it will severely effect your alignment (toe-in), and you may not be able to drive your rig until it’s straightened. Many methods have been used on the trail to straighten them.. hook up a winch, jack it up from the bottom, etc etc. Once you have it straight enough to drive and get back home, you might want to check into a setup like this.
Tools:
- Ratchet
- 19mm socket
- 17mm socket
- 5/16″ wrench
- Plyers or Needle nose plyers
- BFH (big f’in hammer)
- Grease gun w/ grease
Parts:
- 1x ZJ tie rod w/ sleeve
- 2x Castle nuts
- 1x Rubber boot
- 1x Zerk fitting
- 2x Cotter pins
NAPA part numbers:
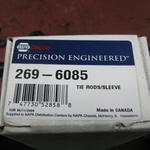
- 269-6085 (Tie rod)
- 269-2788 (Tie rod end)
- ES2079S (Sleeve)
Time:
- 30 minutes
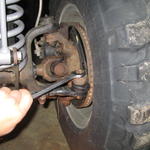
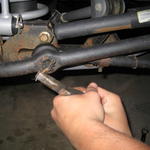
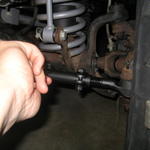
1: As always, make sure you’ve got all your parts and tools before you start! You will need to do a toe-in adjustment afterwards as well. You don’t need a tie rod puller for this, but it wouldn’t hurt. This install was done without one, and it went smoothly. Start off by removing the cotter pin that holds the castle nut in place on the driver’s side. Once that is out, loosen the castle nut a few turns, but do not remove it.
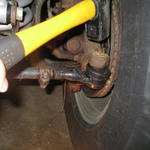
2: The ends of the tie rod are tapered. That means they are “pressed” into the tapered hole on the steering knuckle from tightening the castle nuts down. You can use a tie rod puller for this, but I find a BFH to be just as useful and much quicker. Grab your BFH (ok it doesn’t need to be that big really), and hit the top of the castle nut to pop the tapered end out of the steering knuckle. It might be easy, or it might take a few good hits depending on the amount of rust in that area, and how tight it’s in there.
3: Repeat steps one and two on the other side of the tie rod. Be careful with the hammer here as you don’t want to bend your drag link (the bar that goes from the steering box to the passenger side steering knuckle). Remove both castle nuts and you now have the old tie rod out and are ready to work on the new one.
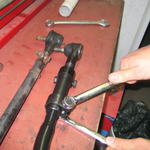
4: Place both the tie rods on the workbench and smile at how awesome your new one is. Grip the new one and feel how beefy it is. Think up some way to bend it on the trail in spite of it’s strength. Now would be a good time to set the new tie rod to the same length as the old one to make your alignment afterwards a little easier. Adjust the sleeve on the driver’s side (the side with the zerk fitting) so it’s got equal thread on either side, and pull up the clamps onto the sleeve. Adjust the new tie rod so the bolts are facing the same direction as the old one for easy installation. Tighten the clamps just tight enough that it won’t be moving around on you while you handle it.
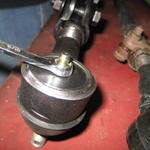
5: Install the rubber boot, then the zerk fitting on the driver’s side with a 5/16″ wrench. Don’t over tighten the zerk fitting, and a little loctite here wouldn’t hurt if you have it. Don’t grease it yet, we’ll do that once it’s installed.
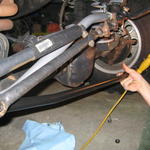
6: Crawl back under your jeep and insert both ends of the new tie rod in their places. You might have to get a friend to get in the jeep and move the steering wheel a bit to get it in place. Put the castle nuts on and tighten them to 55 ft. lbs. You may have to use more or less than 55 ft lbs to get the castle nut to line up correctly for insertion of the cotter pins.
7: Insert the cotter pins and bend the ends back. Grease both ends of the tie rod until you can see the rubber boots start to bulge a little bit.
8: You now need to set your toe in and tighten up the clamps on the sleeve. Make sure when you set the position of your clamps they are in the “up” position as to not get knocked around. I don’t have a write-up for doing this yet, but it is very easy. Here’s a good write-up at 4x4xplor.com on doing so until I add one for myjeeptj.com.
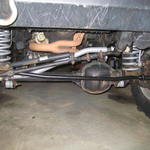
Now you have a beefy tie rod! My brother paid $180 for his brand new at NAPA, and I’m sure it could be had for much cheaper if you looked for a ZJ in the junkyard. The stock tie rod is a 7/8″ diameter hollow tube, and the ZJ tie rod is a 1″ solid rod. As you can probably imagine it’s a heck of a lot stronger. Good luck, and don’t try too hard to bend the new one!
This modification will also work for a Jeep TJ Rubicon.