Sometime in August 2006, not too long after I bought my Jeep I was looking for some lighting upgrades. I had not yet upgraded my headlights to the current Hella H4′s I have now, the stock headlights were terrible, and my Jeep did not come with the factory fog lights. Although my build sheet says it did have them new, the previous owner seemed to have done a little “stripping” before he sold the Jeep. The stock tow hooks were all missing too. I found a set of KC Daylighter 150W sealed beam driving lights on jeepforum.com in the for sale section. The price was right, so I bought them and had them in a week or so. My first impressions was that they were quite big, and very stout. I could only hope they lit up the trails as good as they felt.
The instructions that come with the lights are very complete and you should use them. This write-up is only meant to give you an idea of what I did with my install, and show you how I mounted my switch/relay etc. The KC instructions also do not mention drill sizes, and do not show a Jeep TJ specific install.
Tools:
- Drill
- 1/2″ bit
- 1/8″ bit
- 3/4″ wrench
- Ratchet
- 3/4″ socket
- Wire strippers
- Heat gun
- Phillips screwdriver
- Side cutters
- 13mm wrench
Parts:
- 10 ga. wire
- Butt connectors
- Wire loom
- Shrink wrap
- Zip ties
Time:
- 1-2 hours
1: Make sure you have all the parts listed that come with the package. Also make sure you have some extra wire, as you will likely need it (depending on how you route your wiring).
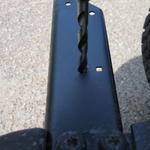
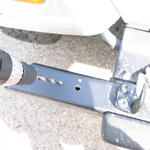
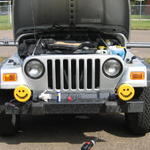
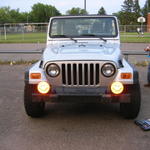
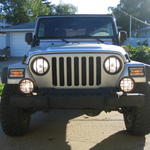
2: Choose a location for your lights. How you mount them will depend on where you want them. I put mine on my stock bumper in the stock mounting holes for the factory fog lights, and I will write this article as if you were mounting them there as well. Start out by drilling the factory bolt holes to 1/2″. You can then insert the Daylighters into the new holes, insert a rubber grommet on the bottom, then a lock washer and nut. Hand tighten the nut, we’ll aim them after they are working.
3: Go ahead and route your wires. You may need to crimp on some extra wire if you route the wire from the driver’s side light all the way to the firewall and over. You will need to use your own discretion at this stage. Take your time and route the wires nicely, use wire loom and lots of zip ties! If you have a soldering iron and heat gun it’s always a good idea to solder your connections, and shrink wrap them. It’s a lot stronger and cleaner than a butt connector! Those with a keen eye may notice I did not have a soldering iron or heat gun when I installed mine, but they have not caused me any issues with water yet (fingers crossed).
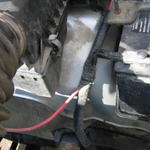
4: Drill a small hole to mount your relay. Make sure you mount it with the open end facing down so if it gets wet it will drain dry instead of holding water. Remove both the in-line fuses at put them in a safe place until you are done the install. I mounted my relay in the fender well near the battery, The small screw sticks into my fender well about 1/8th of an inch. There’s no way for my tire to get up there. I’m not 100% sure of the size of hole I drilled for this but I am 90% sure it was 1/8″. If you’re unsure measure the size of the sheet metal screw that comes with the kit. Make sure you measure the screw without the width of the threads, and that will give you an indication of what to drill.
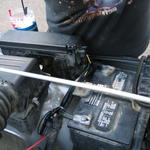
5: Once you have all your wires where you want them, disconnect the positive terminal to your battery and swing the terminal into a safe spot, not touching metal. Hook up your positive lead from the relay to one of the two posts inside your fuse box under the hood. Then you can hook up the negative side to a good ground somewhere or directly to the negative battery terminal. I prefer to run my positive ends of all my accessories to the fuse box instead of the battery because it makes for a cleaner install and shields the connectors from water.
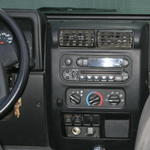
6: Go ahead and start taking your dash apart for the switch install. I started off by taking the top bezel off that has the vents for the defrost in it, on top of the dash. You can lift a corner with a small screwdriver and the rest will pop off by hand. There are two phillips screws on top that hold the main middle dash on. Once those two screws are out you can pull on the section so the top clips pop out. Then you can slide your fingers down and pull on the sides to pop the bottom two out, and the middle section of the dash will be off. You will also want to take the section off underneath your steering wheel. This one has two phillips screws, one on each side. Undo those, and pull the top of it towards you. The clips will pop out, and the bottom just un-hooks.
7: I chose to mount my switch right on top of the screw that holds in the heater controls. There was only two bolts holding in the controls anyway, so I was not losing any mounting hardware. This proved to be a pain because I had to drill a hole through the outside bezel and the heater controls to put the wires through, but to this day I have not thought I would like the switch elsewhere. It’s easy to reach up and hit the switch from the shifter without looking, which I love. The key to this step is to take your time and think well about where you want the switch, and make sure several times that it does not interfere with something once it’s put back together. Once you are certain of the location drill your hole and mount it up! I chose not to use the small switch panel that comes with the kit and installed the switch itself right to the dash plastic. Much cleaner!
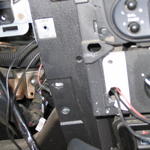
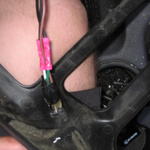
8: Now you can run your wires from the switch. The brown wire from your switch is the ground, and it can be attached to any good ground under the dash. I attached mine to one of the screws that holds the dash together. Just put a screw back in it’s normal place when you reinstall the dash, and put the connector for the ground on that. You can see in this picture where I plan on putting mine (click for a larger version).
9: The green wire is your negative or “load” wire. It runs to the relay you installed under the hood. The white wire is your positive lead. I ran mine directly to one of the positive posts in my fuse box under the hood, but you can also run this to your high beams or low beams if that is how you want your lights to run. That simply means that your lights would only work when the low or high beams have power (are on). I really prefer to have it separate so I can use them whenever and however I like. There is a large rubber grommet that has a wiring harness passing through it under your dash up above the driver’s side footwell. This is a great place to drill a small hole to run wires through.
10: Reconnect your battery, put your dash back together, and install both in-line fuses in their homes. Remember that the two fuses are not the same, so read the labels on the fuse holders and install them properly. Now would also be a good time to make sure you have all your wires covered in loom, and routed nicely. You should also go through and make sure all your connections are good, and everything is “done”.
11: Go ahead and test them out! If you’re having troubles and they are not working at all, double check all your connections and make sure your relay and switch are getting power. A test light works wonders and can be had at your local hardware for under $10. If your relay or switch is not getting power make sure your grounds are good (with the test light), and go from there. You may also have the fuses installed improperly, or you might have blown a fuse. If you have blown a fuse you have a wiring issue, and will need to check all your wiring.
Keep in mind that these lights get very hot very fast. That means that if you leave the covers on for a few minutes it *will* melt them! I use the black rock guards on mine now, and they will melt those too. It’s not much of an issue where I live, but if you are wheeling in hot weather it might be a good idea to wheel with the rock guards off. If you’re moving along though, they will be fine with the heat. Try not to run them on the street. You will annoy other drivers, and you might get a ticket for it. On the trail or even on a highway with low traffic they are amazing. I have several friends with all sorts of different types of lights and none of them stack up to these for sheer brightness. They are not great as a flood light, but they do light up a trail nicely at night anyways. If you’re looking for a real good flood light for the trails, KC offers something for that too. Just be weary when you buy because a sealed beam will hold up to the elements much much better than a non-sealed beam. Not all of KC lights are sealed lenses.
Note: This modification was done on my 2003 TJ. All model years older than 2003 may not use metric fasteners so your tools and bolts may vary slightly. Please do not follow my instructions blindly without checking stuff like bolt sizes out first.